 |
The 8th Gen Riviera Resource
|
| | | Write-Up: Low Beams + Brights On at Same Time |  |
|
+19albertj 2000ws6transam Jason denim 98riv Rickw GMFreak8 AA deekster_caddy Eldo IBx1 Snowdog ghost88 TType_Riviera Mr.Riviera 96RIVMANN turtleman SilverArrow102 NO 4 EVR 23 posters | |
| Author | Message |
|---|
deekster_caddy
Master
Name : Derek
Age : 52
Location : Reading, MA
Joined : 2007-01-31
Post Count : 7717
Merit : 109
| | Subject: Re: Write-Up: Low Beams + Brights On at Same Time Fri May 08, 2009 12:44 pm | |
| - Eldo wrote:
- deekster_caddy wrote:
- Please don't use Scotch-Loks, ever, in any automotive wiring that you want to work. Do it right, or don't bother.
Alright Deek, first the ECON, now the Scotch-Loks... Are you following me around and just trying find mistakes? 
But seriously folks, my family (of mechanics) has been using Scotch-Loks in the shop probably since they were invented. You do have to use the right gauge and the right technique. Besides, the original post I was referencing was literally describing stripping insulation, wrapping wires and taping, not soldering... The Scotch-Lok is not only a helluva lot easier, but it was a gentle nudge in a better direction. Sorry for sounding critical in so many places at once!!  Not meaning to give you a hard time, just wanted to warn people away from scotch-loks!! Well... I have had many bad experiences with Scotch-Loks, enough to recommend against them. My first few electrical jobs I discovered them (after wire nuts failed), and how easy they seemed to use... but a few issues - they don't handle vibration well, and they don't handle exposure to the elements well. Do they work? Yes, at first... then when you start having problems and finally trace it back to the scotch lok time and time again... you develop a negative attitude towards them. I now only use non-insulated butt connectors and sealed heat shrink tubing, and haven't had a connection failure since. I don't like the 'insulated' butt connector because the crimp is very weak at best. The crush through crimp with the non-insulated butt connector is the best connection you can make. (IMO) | |
| | | | Eldo
Expert

Name : Mark
Age : 59
Location : West Salem, Oregon... FINALLY
Joined : 2009-04-09
Post Count : 3141
Merit : 104
| | Subject: Re: Write-Up: Low Beams + Brights On at Same Time Sat May 09, 2009 12:36 am | |
| - deekster_caddy wrote:
Sorry for sounding critical in so many places at once!! Not meaning to give you a hard time, just wanted to warn people away from scotch-loks!!
Well... I have had many bad experiences with Scotch-Loks, enough to recommend against them. My first few electrical jobs I discovered them (after wire nuts failed), and how easy they seemed to use... but a few issues - they don't handle vibration well, and they don't handle exposure to the elements well. Do they work? Yes, at first... then when you start having problems and finally trace it back to the scotch lok time and time again... you develop a negative attitude towards them. I now only use non-insulated butt connectors and sealed heat shrink tubing, and haven't had a connection failure since. I don't like the 'insulated' butt connector because the crimp is very weak at best. The crush through crimp with the non-insulated butt connector is the best connection you can make. (IMO) Gee, I can't believe that we've just been lucky all this time... Are you in a snow & salt area? Considering some of the rust I've seen on this site, in places where my car is pristine (like the fuel-pump/sender lock-ring,) maybe the benign California climate is responsible for our success with Scotch-Loks & crimps. I will say this, like you with the insulated crimps, I don't get the best results just doing it "the usual way"... My success with the insulated crimps is to pinch them longitudinally , from the ends instead of sideways, using the tips of Channel-Loks in the first position, 2 times on each end. This lets you give much more pressure than a crimp-tool... With the Scotch-Loks, I always set the pliers so that the jaws are parallel when they press the "knife" in. And like I mentioned above, you do have to use the correct gauge (color) with the Scotch Locks... On exterior, exposed wiring, I'll use a 'naked' crimp and then flood it with solder and cover with shrink-tube or tape. But for a "vampire" tap, where you want to tap into an existing wire rather than mating two cut wires, I still get good results with a Scotch-Lok. On the boat trailer, I squeezed, snapped the cap, and then drowned in silicone... Mark | |
| | | | Eldo
Expert
Name : Mark
Age : 59
Location : West Salem, Oregon... FINALLY
Joined : 2009-04-09
Post Count : 3141
Merit : 104
| | Subject: Re: Write-Up: Low Beams + Brights On at Same Time Sat May 09, 2009 12:45 am | |
| - AA wrote:
- I am running low beams 80W. Stock is 53W.
High beams (also daytime runners) are original equip.
Just pointing out that the plastic can take a significant increase in power without issue (so far). I understand what you're saying, but let me be clear... The DRL's are Hi-Beams running in series together, at half power. When the "real' headlights turn on, they go out. What we were talking about above is running the Low-Beam bulb at night along with the Hi-Beam bulb when shifting to Hi-Beams... I.E. like the good old days when we had 4 separate lights and all four lit up when going to Hi-Beam, the Low's still illuminated the area close to the car, and the Hi's lit up the distance. I'm not saying that it won't work, and indeed, I want to do it myself, I just got wary one night when I had the Low's on in the garage with a rag laying over one of them - it caused a burn mark in the plastic lens... If the Rivi had the same GLASS lenses that our LeSabre had, it wouldn't be a question.
Last edited by Eldo on Wed May 27, 2009 4:12 am; edited 1 time in total | |
| | | | deekster_caddy
Master
Name : Derek
Age : 52
Location : Reading, MA
Joined : 2007-01-31
Post Count : 7717
Merit : 109
| | Subject: Re: Write-Up: Low Beams + Brights On at Same Time Sat May 09, 2009 7:38 am | |
| My wife's new VW Passat (okay, an '08 not new anymore) has factory HIDs. The way they work - the low beam HIDs are on all the time, whether you are using high or low beams. The high beams are more like a supplement. To be honest, the HIDs are aimed so well I very very rarely want the highs on anyway! But the functionality is what you have been describing here.
I think the reasoning is that you don't want the momentary darkness when you switch from high to low and have to wait for the ballasts to fire the HIDs... so just leave them on all the time. | |
| | | | Eldo
Expert
Name : Mark
Age : 59
Location : West Salem, Oregon... FINALLY
Joined : 2009-04-09
Post Count : 3141
Merit : 104
| | Subject: Re: Write-Up: Low Beams + Brights On at Same Time Sat May 09, 2009 3:16 pm | |
| - deekster_caddy wrote:
- My wife's new VW Passat (okay, an '08 not new anymore) has factory HIDs. The way they work - the low beam HIDs are on all the time, whether you are using high or low beams. The high beams are more like a supplement. To be honest, the HIDs are aimed so well I very very rarely want the highs on anyway! But the functionality is what you have been describing here.
I think the reasoning is that you don't want the momentary darkness when you switch from high to low and have to wait for the ballasts to fire the HIDs... so just leave them on all the time. Ahh, I think you're right about that. Do you think (and I know this isn't scientific) that the HID's are more efficient and put out less heat than halogens? | |
| | | | deekster_caddy
Master
Name : Derek
Age : 52
Location : Reading, MA
Joined : 2007-01-31
Post Count : 7717
Merit : 109
| | Subject: Re: Write-Up: Low Beams + Brights On at Same Time Sat May 09, 2009 7:30 pm | |
| - Eldo wrote:
- Do you think (and I know this isn't scientific) that the HID's are more efficient and put out less heat than halogens?
Hard to say. I really haven't noticed any heavy electrical draw, or anything that feels like excessive heat. The color is bluish, not sure how that effects heat either, but the light is damn impressive. | |
| | | | Snowdog
Addict

Name : Timo
Age : 38
Location : Finland
Joined : 2008-10-04
Post Count : 732
Merit : 24
| | Subject: Re: Write-Up: Low Beams + Brights On at Same Time Sun May 10, 2009 1:31 am | |
| i readed from sellers that HID's produce less heat and take less electrisity when they are on. only when they start up they need more. | |
| | | | Eldo
Expert
Name : Mark
Age : 59
Location : West Salem, Oregon... FINALLY
Joined : 2009-04-09
Post Count : 3141
Merit : 104
| | Subject: Re: Write-Up: Low Beams + Brights On at Same Time Sun May 10, 2009 1:47 am | |
| - Snowdog wrote:
- i readed from sellers that HID's produce less heat and take less electrisity when they are on. only when they start up they need more.
Thanks! | |
| | | | GMFreak8
Addict

Name : Kyle
Age : 35
Location : Malone, New York
Joined : 2009-03-15
Post Count : 638
Merit : 15
| | Subject: Re: Write-Up: Low Beams + Brights On at Same Time Sat Dec 12, 2009 9:41 am | |
| I'd love to do this modification on mine. The lights just seem so dim even when on bright. But if I hold the signal stalk just right I can actually get both sets of lights to come on. That provides the perfect amount of light (especially combined with my xenon fog lights). Only downfall is I have to hold the signal stalk the whole time or I only get brights or dims.  | |
| | | | Snowdog
Addict
Name : Timo
Age : 38
Location : Finland
Joined : 2008-10-04
Post Count : 732
Merit : 24
| | Subject: Re: Write-Up: Low Beams + Brights On at Same Time Sat Dec 12, 2009 10:02 am | |
| i moded mine a bit so bouth stay on whit Hid low's, want to get hid highs tho.
i truyed to make a writeup once but, well as my english is so crapy nothign came out.
on my showroom there is some info about the wires what to conect where to make it happen. | |
| | | | IBx1
Expert

Name : ILAN
Age : 32
Location : College Station, TX
Joined : 2007-12-30
Post Count : 4304
Merit : 69
| | Subject: Re: Write-Up: Low Beams + Brights On at Same Time Sat Dec 12, 2009 11:13 am | |
| Think you could draw it out? Just a simple drawing when you get the time. Visual aids are how I learn the best, and I really want to do this mod because I feel my HID's hurt when I switch from brights back to lows. | |
| | | | Snowdog
Addict
Name : Timo
Age : 38
Location : Finland
Joined : 2008-10-04
Post Count : 732
Merit : 24
| | Subject: Re: Write-Up: Low Beams + Brights On at Same Time Sat Dec 12, 2009 12:08 pm | |
| i truy to draw the skem on paper.
will need some wires, reley, something to cut/clan the protection layer of the wires, and some protection hoses what what you but on the wire connections and later blow hot air on them to make them tighten and seal the connections. | |
| | | | IBx1
Expert
Name : ILAN
Age : 32
Location : College Station, TX
Joined : 2007-12-30
Post Count : 4304
Merit : 69
| | Subject: Re: Write-Up: Low Beams + Brights On at Same Time Sat Dec 12, 2009 12:55 pm | |
| I might get all the stuff over the winter break and try it out once you get the drawing up. Heat shrink, wires, and a relay. | |
| | | | AA
Administrator

Name : Aaron
Age : 46
Location : C-bus, Ohio
Joined : 2007-01-13
Post Count : 18448
Merit : 252
| | Subject: Re: Write-Up: Low Beams + Brights On at Same Time Sat Dec 12, 2009 2:07 pm | |
| _________________ '05 GTO 6.0L • 6-spd • 95k miles • 0-60: 4.8s • 16.9 avg MPG • Nelson Ledges Lap: 1:26'95 Celica GT 2.2L • 5-spd • 165k miles • 0-60: yes'98 SC Riviera • 281k miles • 298 HP/370 TQ • 0-60: 5.79s • ET: 13.97 @ 99.28 • 4087 lb • 20.1 avg MPG • Nelson Ledges Lap: 1:30
3.4" pulley • AL104 plugs • 180º t-stat • FWI w/K&N • 1.9:1 rockers • OR pushrods • LS6 valve springs • SLP headers • ZZP fuel rails
KYB GR2 struts • MaxAir shocks • Addco sway bars • UMI bushings • GM STB • Enkei 18" EV5s w/ Dunlop DZ101s • F-body calipers
EBC bluestuff/Hawk HP plus • SS lines • Brembo slotted discs • DHP tuned • Aeroforce • Hidden Hitch^^^ SOLD ^^^ '70 Ninety-Eight Holiday Coupe 455cid • 116k miles^^^ SOLD ^^^ | |
| | | | Eldo
Expert
Name : Mark
Age : 59
Location : West Salem, Oregon... FINALLY
Joined : 2009-04-09
Post Count : 3141
Merit : 104
| | Subject: Re: Write-Up: Low Beams + Brights On at Same Time Sat Dec 12, 2009 2:47 pm | |
| EDIT: Revised schematic for modifying all '95 to '99s on next page...
Last edited by Eldo on Fri Jul 02, 2010 8:05 pm; edited 1 time in total | |
| | | | Snowdog
Addict
Name : Timo
Age : 38
Location : Finland
Joined : 2008-10-04
Post Count : 732
Merit : 24
| | Subject: Re: Write-Up: Low Beams + Brights On at Same Time Sun Dec 13, 2009 4:07 am | |
|  Hope everyone understands it now. Good luck. | |
| | | | Eldo
Expert
Name : Mark
Age : 59
Location : West Salem, Oregon... FINALLY
Joined : 2009-04-09
Post Count : 3141
Merit : 104
| | Subject: Re: Write-Up: Low Beams + Brights On at Same Time Sun Dec 13, 2009 5:40 am | |
| To make it clear for other relays, 30 & 87 are the 'switched' terminals, Common and Normally Open (COM & N.O.)
86 & 85 are the trigger or 'Coil' terminals, often labeled with a a coil or inductor symbol that kinda' looks like: _OOOO_
Last edited by Eldo on Sun Dec 13, 2009 6:31 pm; edited 1 time in total | |
| | | | Rickw
Guru
Name : Rick
Location : Lancaster, MA
Joined : 2008-09-13
Post Count : 6282
Merit : 119
| | Subject: Re: Write-Up: Low Beams + Brights On at Same Time Sun Dec 13, 2009 11:07 am | |
| What's stopping the Daytime Running Lights from energizing the relay and turning on all the lights.
If you follow the path of the Blue wire through the High Beams - Green wire direct to terminal #86 of the relay and energizing the relay, then you have Lows and Highs on.
Does the DRL circuit need to be cut. That is to say does the Blue wire need to be cut and DRL's rendered inop. for this to work the way it is intended.? | |
| | | | Snowdog
Addict
Name : Timo
Age : 38
Location : Finland
Joined : 2008-10-04
Post Count : 732
Merit : 24
| | Subject: Re: Write-Up: Low Beams + Brights On at Same Time Sun Dec 13, 2009 11:32 am | |
| i was thinking of it tho.
my car did not have DRL and so much as i know they came from +97?
One chance is to cut it so you should allways switche the lights on manualy.
Have to think about it for some time how to make it work whit DRL. | |
| | | | Eldo
Expert
Name : Mark
Age : 59
Location : West Salem, Oregon... FINALLY
Joined : 2009-04-09
Post Count : 3141
Merit : 104
| | Subject: Re: Write-Up: Low Beams + Brights On at Same Time Sun Dec 13, 2009 6:29 pm | |
| By God, you're right Rick, I didn't catch that.
There would be 6 or 7 volts at the trigger wire when the DRLs are on...
Maybe a resistor on the Coil input of the relay would work, but that would take trial and error.
The sure thing would be to use a second, identical relay with its trigger wire tapped into the blue DRL line, and the COM and Normally CLOSED terminals interrupting the green wire to the other relay.
When the DRLs are hot, Relay 2 would hold the contacts OPEN, so that the high-beam power cannot reach Relay 1 thru the green trigger wire. When the headlamps are turned on, the DRL output becomes ground, and Relay 2 would release the N.C. contacts and complete the green circuit, enabling Relay 1 to do the original job when the brights are selected.
Timo, can you add another relay to the diagram the way I described?
Mark | |
| | | | Snowdog
Addict
Name : Timo
Age : 38
Location : Finland
Joined : 2008-10-04
Post Count : 732
Merit : 24
| | Subject: Re: Write-Up: Low Beams + Brights On at Same Time Mon Dec 14, 2009 10:36 am | |
| hmm that makes sence.
I truy my best. i'm a bit busy atm but when i get more time il do it. otherwise. all who own 95-96 could use this one there. just ignore the DRL wire cos they do not have one. | |
| | | | Eldo
Expert
Name : Mark
Age : 59
Location : West Salem, Oregon... FINALLY
Joined : 2009-04-09
Post Count : 3141
Merit : 104
| | Subject: Re: Write-Up: Low Beams + Brights On at Same Time Thu Dec 17, 2009 3:25 am | |
| OK, here's the revision to make this mod work on cars with or without DRLs... Dashed-green line used withOUT DRL relay I can't believe this goes back FIFTEEN years... Oy! Anyway, it occurred to me that Aaron has touched on two points that could make a difference on a given vehicle & relay. For safety, I used an IGN positive for power so the relays aren't always hot. The IGN 1 & IGN 3 fuses are 60-amp, so stock low-beams shouldn't be a problem at 10 amps, but his using Battery positive is easier and could be necessary for non-standard lights. Also, adding the DRL relay was based on worst-case theories we had, and it can't hurt anything, but according to Aaron's real-world use his low-beam relays did not trigger at the 1/2-voltage that the DRL's have on the light-green wire BETWEEN the hi-beams. The blue DRL output from the LCM is still full voltage. On the other hand, I don't think separate relays are necessary for each lo-beam bulb... He used 40-amp relays, each of which could safely handle 360 watts.
Last edited by Eldo on Sat Mar 30, 2024 2:03 am; edited 3 times in total | |
| | | | Snowdog
Addict
Name : Timo
Age : 38
Location : Finland
Joined : 2008-10-04
Post Count : 732
Merit : 24
| | Subject: Re: Write-Up: Low Beams + Brights On at Same Time Thu Dec 17, 2009 6:11 am | |
| Okay I changed my skem. This is for 95-96 Rivieras whitout DRL. | |
| | | | AA
Administrator
Name : Aaron
Age : 46
Location : C-bus, Ohio
Joined : 2007-01-13
Post Count : 18448
Merit : 252
| | Subject: Write-Up: Low Beams + Brights On at Same Time Mon Jun 27, 2011 4:10 am | |
| Something I've always wondered: is there a way to keep the low beams on when the brights are switched on at night? A while ago when driving at night, I noticed that as the stalk is pulled back to activate the brights, there is a point where the lows and highs are on together. As the stalk clicks, the low beams are shut off as tension is released. When the brights are deactivated, the process is reversed and the low beams come back on. Makes sense. Less load on the system & wiring, and less heating in the headlamp assembly. But I soon got into the habit of pulling the stalk and holding it for a few seconds when I really needed to see something up ahead. It was obvious that the brights alone were not giving me the illumination I wanted. This became even more noticeable in recent years, when driving other vehicles with projector HID bulbs. These newer lighting systems are so extremely bright! I tried upgrading the high beams to a higher wattage, but still I could always go brighter by performing the stalk holding trick. Problem is, I don't like holding it for long periods of time, so what could be done? We know the high beams also function as daytime running lamps (on later years at least), and they are also illuminated when using the key fob to lock/unlock the car. A quick voltage measurement showed that in both of these applications the brights are operating on 5.5-6v. This is when I thought of an idea: could a pair of 12v relays be used to switch on the low beams, using the high beams' voltage as a trigger? If so, wouldn't the low beams also be triggered in daytime running mode? The answer would depend on how much voltage it took to activate the relays, and as it turns out 6v was not enough to activate the relay coils I used. If you would like your low beams to remain on with the brights, the following modification is fairly simple to perform, and should take 2-3 hours. It is low cost, and requires only a few basic tools. Please read the following carefully before proceeding: DISCLAIMER: MY CAR'S LIGHTING CONTROL MODULE HAD NOT BEEN FUNCTIONING CORRECTLY FOR SOME TIME PRIOR TO ATTEMPTING THIS MODIFICATION. THE HEADLAMPS WOULD NO LONGER AUTOMATICALLY TURN ON AT NIGHT, AND SO WERE MANUALLY SWITCHED ON. OTHERWISE, THE LIGHTING SYSTEM WORKED FINE. THE CONDITION WAS UNRELATED TO THE MODIFICATION OUTLINED IN THIS WRITE-UP, AND I SEE NO REASON IT SHOULD HARM A PROPERLY FUNCTIONING LIGHTING CONTROL MODULE. HOWEVER, IF YOU ARE NOT COMFORTABLE TAKING A RISK, PLEASE DO NOT ATTEMPT THIS MOD ON YOUR CAR; IT HAS NOT YET BEEN TESTED ON A 100% WORKING SYSTEM.
FURTHERMORE, I HAVE NOT CONDUCTED ANY LONG TERM TESTING OF BRIGHTS RUNNING IN THIS ARRANGEMENT. I DRIVE MOSTLY SHORT TRIPS IN RURAL AREAS, AND DON'T NEED TO RUN THEM FOR EXTENDED PERIODS. IF YOUR HEADLAMP ASSEMBLIES MELT ON THE NIGHT TRIP FROM LA TO PHOENIX, DON'T BLAME ME. YOU'RE TAKING THE RISK!Tools needed: • 10mm socket wrench • wire stripper • crimping tool • hands Parts needed: • 16 gauge stranded wire (18 ga optional) • crimp connectors (blue or yellow), male/female blade push-on type (bullet type optional) • crimp connectors, ring or spade type • electrical tape • two (2) 40 Amp 12v Single Pole, Single Throw (SPST) Relays w/ Normally Open (NO) Contacts. This is the most basic and common type of automotive relay, and should be available at most auto parts counters for about $5 ea. I used Pilot relays from AutoZone, as shown below:  Scope: a wire connected to each high beam positive (+) lead will drive a single 12v relay, one per side. Activating the relays will close two circuits, supplying +12v battery power to each low beam positive (+) lead, routed via wires connected to the relay contacts. +6v power used for daytime running lamps will not be sufficient to trip the relays, resulting in the low beams remaining off in daytime, and during remote lock/unlock operations. Here is a schematic of the circuits. Please study before attempting the modification. +12v on L&R high beams are light green, +12v on L&R low beams are tan color:  STEP 1: disconnect the battery. Don't skip this, just do it. No need to start a fire or melt your tools because you forgot. STEP 2: disconnect high beam on driver side. Split the loom a few inches from the connector and cut the light green wire. Strip insulation on both ends, and prepare a 10" length of 16-18 ga wire stripped on both ends. Crimp the 10" wire to one of the lt. green ends. You can use blade type connectors, or bullet type. Crimp a female blade connector to the other end of the 10" wire. Should look like this:  STEP 3: reconnect the lt. green wire and recover with loom, allowing the 10" wire to exit. Apply tape around loom if needed. Reconnect high beam connector. Route the 10" wire through the end of the upper radiator panal (see STEP 5 for ref) and connect to one of the coil terminals of the relay. If relay is polarized, connect to the (+) terminal. Using a 4" length of 16-18 ga wire, connect the other coil terminal to ground using one of the chassis screws holding the upper radiator panel to the fender:  STEP 4: disconnect low beam on driver side. Split the loom a few inches from the connector and cut the tan wire. Strip insulation on both ends, and prepare a 12" length of 16 ga wire stripped on both ends. Crimp the 12" wire to one of the tan ends. As above, use blade type connectors, or bullet type. Crimp a female blade connector to the other end of the 12" wire and connect to one of the switched terminals of the relay. Route the 10" wire through the end of the upper radiator panel as shown in STEP 5: 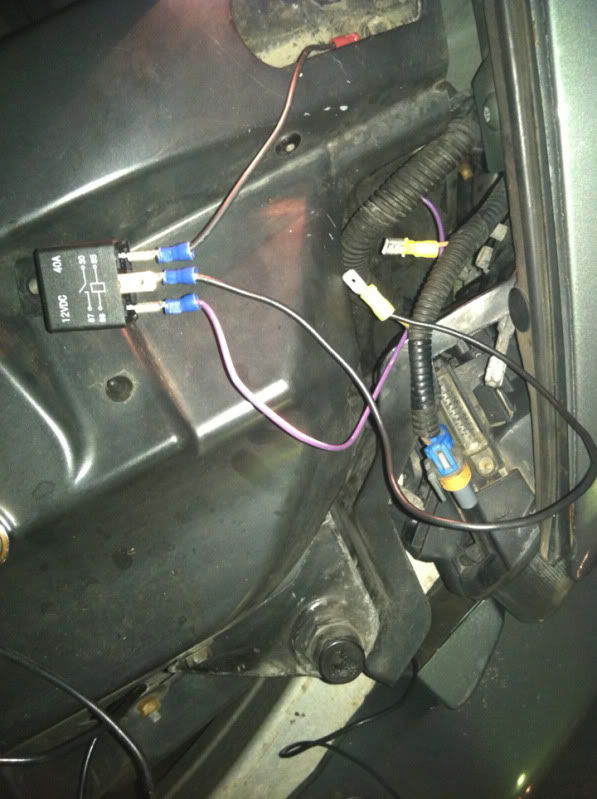 STEP 5: snake a 5 ft piece of 16 ga or larger wire through the upper radiator panel until it comes out on the passenger side end. On driver side, apply a blade type crimp connector and connect to the remaining switched contact of relay. This wire will connect to the +12v terminal on the passenger side of the engine bay. IMPORTANT: this wire must be 16 gauge or larger. View of driver side :  STEP 6: wiring of driver side is complete. Now you will repeat a mirror image of the above process to the passenger side wiring. When complete, the passenger side wiring should look the same as the driver side. The 16 ga wire that was snaked through the upper radiator panel can now be routed to and connected to the +12 v terminal. Run a 2nd wire back from the terminal to the passenger side relay's switched contacts (look closely, there are two!):  STEP 7: after crimping and connecting the last wire to the relay, the wiring is complete. Tape around any exposed relay terminals. Reconnect the battery and flip on the brights to test. All four bulbs should illuminate. Test daytime running lamps and remote commands if necessary. If all is working correctly, mount the relays inside the access holes in the upper radiator panel. This provides access and easy relay removal if needed. Picture of completed passenger side:  If for any reason this mod should cause any problems, or your head lamp assemblies seem too hot (I have no idea how hot is "too hot"), you can disable the mod easily by cutting or disconnecting the power wires running to the +12v terminal. Be careful if/when you do this, as the wires will be hot +12v at all times. Best advice is to disconnect the battery before cutting power. A safer way to disable the mod is to cut the grounds to the relay coils on both sides. Be careful not to touch your tool to the hot switched terminals when you do this! If one of the relays should fail over time, the most likely symptom would be one of the low beams will not come on with the brights, indicating the relay on that side (or a wire, connector) has a fault. Replacing the relay should remedy the problem. Of course, check the low beams with brights off to eliminate the possibility of a bad bulb. Yes, it's probably possible a relay could fail switched "on", giving you no way to turn off the lamp on that side. I think this is highly unlikely to ever happen. If it did, you would see one of your brights on full brightness, even with car off. Solution, cut power to the +12v terminal as described above. Best of luck to anyone who tries this. Hope someone else enjoys it as much as I have. _________________ '05 GTO 6.0L • 6-spd • 95k miles • 0-60: 4.8s • 16.9 avg MPG • Nelson Ledges Lap: 1:26'95 Celica GT 2.2L • 5-spd • 165k miles • 0-60: yes'98 SC Riviera • 281k miles • 298 HP/370 TQ • 0-60: 5.79s • ET: 13.97 @ 99.28 • 4087 lb • 20.1 avg MPG • Nelson Ledges Lap: 1:30
3.4" pulley • AL104 plugs • 180º t-stat • FWI w/K&N • 1.9:1 rockers • OR pushrods • LS6 valve springs • SLP headers • ZZP fuel rails
KYB GR2 struts • MaxAir shocks • Addco sway bars • UMI bushings • GM STB • Enkei 18" EV5s w/ Dunlop DZ101s • F-body calipers
EBC bluestuff/Hawk HP plus • SS lines • Brembo slotted discs • DHP tuned • Aeroforce • Hidden Hitch^^^ SOLD ^^^ '70 Ninety-Eight Holiday Coupe 455cid • 116k miles^^^ SOLD ^^^ | |
| | | | 98riv
Moderator
Location : USA
Joined : 2007-01-14
Post Count : 995
Merit : 30
| | Subject: Re: Write-Up: Low Beams + Brights On at Same Time Mon Jun 27, 2011 1:23 pm | |
| Nice write up! I remember a few of the Regal/GP croud used to run a harness a few years ago from suvlights. I think it was this one for the Regals Link. It was meant to allow you to run higher wattage bulbs on the stock wiring. I don't remember if it allows you to run both bulbs at once, but it looks like you could modify it by the write up above if you didn't want to cut into your stock wiring.
_________________
1998 Supercharged Riviera - Custom CAI, Alpine spx-13ref, Infinity 6x9's, Alpine 4 Channel Amp, Kicker KX3, Silverstars, STB, Hawk Brake Pads, Monroe Air Shocks, KYB GR2
| |
| | | | Sponsored content
| | Subject: Re: Write-Up: Low Beams + Brights On at Same Time | |
| |
| | | | | | Write-Up: Low Beams + Brights On at Same Time | |
|
Similar topics | |
|
| | Permissions in this forum: | You cannot reply to topics in this forum
| |
| |
| |
|


